Sunday, December 27, 2009

Maine Potato Candy

Potato candy. Weird, right? Weird, but delightful. Also known as needhams, this is a candy I made for the holidays. I didn't have a recipe and really wanted to use a recipe from a Mainer. Marg Standish pulled through again.

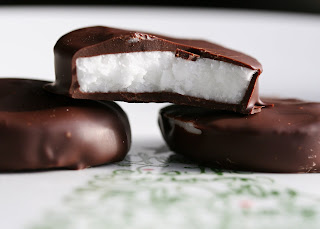
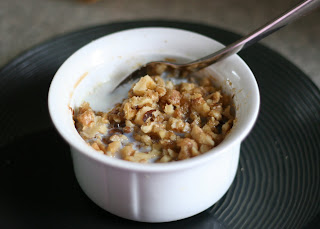
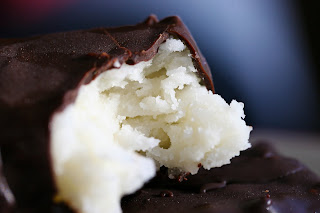
You would never ever know that this sweet coconut candy has potato in it. The recipe for the middle is perfect. I wouldn't alter that at all. The chocolate coating could use some altering. Marg uses wax in her candy coating. I find this really tricking to use. I ended up removing some of the unmelted wax when the coating looked really thin but I could have removed even more. Once you dip the coconut mixture into the chocolate and remove it the coating starts to solidify immediately. It just made things really messy. They were still quite pretty and of course tasty, but I would use a little less wax next time.
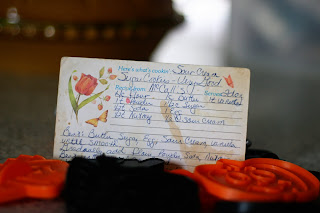

Needhams
Source: Marjorie Standish
Yield: 4 dozen or so

3/4 c. mashed potato
1/2 tsp. salt
2 (1 lb.) pkgs. confectioner's sugar
1 stick butter
1/2 lb. flaked coconut
2 tsp. vanilla

Pare and cook potato to make 3/4 cup mashed potato (not seasoned). Add salt. Using a double boiler place stick butter in it and melt over boiling water. Add mashed potato, confectioner's sugar, flaked coconut and vanilla.
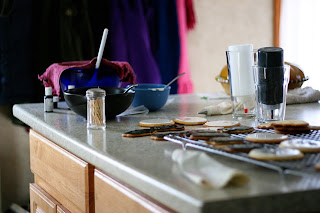
Mix well, then turn into a buttered jelly roll pan. Spread evenly. Place in a cool place to harden. When hard, cut into small squares and dip in the following chocolate mixture.


CHOCOLATE DIP:

1 (12 oz.) pkg. chocolate bits
4 sq. unsweetened chocolate
1/2 cake paraffin (2 1/2 x 2 1/2) ) Yes, the same paraffin you melt to use on top of jelly)

Use double boiler, again. Place paraffin in top over boiling water to melt. Then add the 2 kinds of chocolate. Allow chocolate to melt. Stir well to mix ingredients.
A toothpick or cake tester may be used to dip the needham squares. Hold each square above chocolate mixture after dipping so the square drains well. Place on waxed paper to harden. Recipe will make 66 good sized needhams. Halves easily.

Mrs. York

You can just call me Mrs. York, as in, York Peppermint Patties. They are my favorite candy and I decided to make them for the holidays this year.

I think I have tried making them before and failed...I can't remember how my attempt failed but I remember throwing most of the filling out. Maybe it didn't stiffen too much. Eh.

Not this time. These. Are. Perfect. After dipping the first one a slow smile came over my face. These would certainly wow my family and friends. The chocolate was smooth. The middle was cool and minty. The balance of chocolate and mint was perfect. The looked gorgeous!

I didn't temper my chocolate. I didn't do anything to the chocolate other than melt it. I used Ghirardelli dark chocolate bits. Yum.

Oh...and I didn't have a 1 inch cookie cutter (I just ordered a set of round cutters from Amazon) so I used a shot glass. Worked perfect.

I will definitely make this again and again.


Peppermint Patties
Source: Gourmet Magazine
Yield: 3-4 dozen

2 1/2 cups confectioners sugar, divided
1 1/2 tablespoons light corn syrup
1 1/2 tablespoons water
1/2 teaspoon pure peppermint extract
1 T shortening
10 ounces 70%-cacao bittersweet chocolate, coarsely chopped

Make filling:
Beat 2 1/4 cups confectioners sugar with corn syrup, water, peppermint extract, shortening, and a pinch of salt using an electric mixer (with paddle attachment if using a stand mixer) at medium speed until just combined. Knead on a work surface dusted with remaining 1/4 cup confectioners sugar until smooth. Roll out between sheets of parchment paper on a large baking sheet into a 7- to 8-inch round (less than 1/4 inch thick). Freeze until firm, about 15 minutes. Remove top sheet of paper and sprinkle round with confectioners sugar. Replace top sheet, then flip round over and repeat sprinkling on other side.

Cut out as many rounds as possible with cutter, transferring to a parchment-lined baking sheet. Freeze until firm, at least 10 minutes. Meanwhile, gather scraps, reroll, and freeze, then cut out more rounds, freezing them.

Temper chocolate and coat filling:
Melt three fourths of chocolate in a metal bowl set over a saucepan of barely simmering water. Remove bowl from pan and add remaining chocolate, stirring until smooth. Cool until thermometer inserted at least 1/2 inch into chocolate registers 80°F.

Return water in pan to a boil and remove from heat. Set bowl with cooled chocolate over pan and reheat, stirring, until thermometer registers 88 to 91°F. Remove bowl from pan.

Balance 1 peppermint round on a fork and submerge in melted chocolate, letting excess drip off and scraping back of fork against rim of bowl if necessary, then return patty to sheet (to make decorative ridges on patty, immediately set bottom of fork briefly on top of patty, then lift fork straight up). Coat remaining rounds, rewarming chocolate to 88 to 91°F as necessary. Let patties stand until chocolate is set, about 1 hour.

Friday, December 18, 2009

Legen...wait for it...

DARY! (Get it?!...Barney Stinson? No?...tough crowd!)

Anyhow, these cookies are legendary. They are all over food blogs. And with good reason too!!

I have a chocolate chip cookie recipe that is mine, I altered it to fit my taste buds and I love it. So when I decided to try this recipe I figured that I would like mine better. Whelp. TIE. I can't say that I like either one better. They are actually quite similar in texture and taste. If you don't have a chocolate chip cookie recipe that you really like, try these.

This article will provide you with more than you ever wanted to know about chocolate chip cookies. I devoured every word like it was a cookie itself. That is good reading!!


New York Times Chocolate Chip Cookies
Source: New York Times
Yield 1.5 dozen cookies

2 cups minus 2 tablespoons
(8 1/2 ounces) cake flour
1 2/3 cups (8 1/2 ounces) bread flour
1 1/4 teaspoons baking soda
1 1/2 teaspoons baking powder
1 1/2 teaspoons coarse salt
2 1/2 sticks (1 1/4 cups) unsalted butter
1 1/4 cups (10 ounces) light brown sugar
1 cup plus 2 tablespoons (8 ounces) granulated sugar
2 large eggs
2 teaspoons natural vanilla extract
1 1/4 pounds bittersweet chocolate disks or fèves, at least 60 percent cacao content
Sea salt

1. Sift flours, baking soda, baking powder and salt into a bowl. Set aside.

2. Using a mixer fitted with paddle attachment, cream butter and sugars together until very light, about 5 minutes. Add eggs, one at a time, mixing well after each addition. Stir in the vanilla. Reduce speed to low, add dry ingredients and mix until just combined, 5 to 10 seconds. Drop chocolate pieces in and incorporate them without breaking them. Press plastic wrap against dough and refrigerate for 24 to 36 hours. Dough may be used in batches, and can be refrigerated for up to 72 hours.

3. When ready to bake, preheat oven to 350 degrees. Line a baking sheet with parchment paper or a nonstick baking mat. Set aside.

4. Scoop 6 3 1/2-ounce mounds of dough (the size of generous golf balls) onto baking sheet, making sure to turn horizontally any chocolate pieces that are poking up; it will make for a more attractive cookie. Sprinkle lightly with sea salt and bake until golden brown but still soft, 18 to 20 minutes. Transfer sheet to a wire rack for 10 minutes, then slip cookies onto another rack to cool a bit more. Repeat with remaining dough, or reserve dough, refrigerated, for baking remaining batches the next day. Eat warm, with a big napkin.

Wednesday, December 16, 2009

Hershey's vs. MIL

Quite some time ago my mother in law made chocolate crinkles cookies. I had never had one and not one to ever ever turn down chocolate I tried one directly from the cooling rack. Delicious. Wonderful. Amazing. Later that year I purchased this little Hershey's baking booklet. You know the kind that is overpriced but suck you in at the supermarket register. Well that little booklet was worth the $5. I use it all the time. In the back there is a section of recipes that use dark chocolate and the book talks a little about antioxidents. One of the recipes included in that section is chocolate crinkles.

Now, keep in mind that MIL gave me the recipe for her cookies. I just never made them. And I thought, well...the Hershey's one is probably amazing. So I tried it. And it just wasn't the same. It looked just like hers. And yes, it was chocolately and yes, I ate half the batch. Just something was off. The next day I dug out the recipe MIL had given me years ago and gave that a go. MIL WINS!! I don't know what it is but that recipe is awesome. Love.


My "forever friend" Tina turned 26 for the 4th time this month. (That makes her 30!) Her boyfriend and friend worked together to get a group of Tina's friends together for dinner in the Old Port. I brought along a package of these cookies for my friend who shared them with her friends. A bit hit!!


Yes, dark chocolate is healthy!!


Chocolate Crinkle Cookies

Source: MIL!
Yield: 2-3 dozen

1/2 cup vegetable oil
4 oz unsweetened baking chocolate, melted, cooled
2 cups granulated sugar
2 teaspoons vanilla
4 eggs
2 cups flour
2 teaspoons baking powder
1/2 teaspoon salt
1/2 cup powdered sugar

1. In large bowl, mix oil, chocolate, granulated sugar and vanilla. Stir in eggs, one at a time. Stir in flour, baking powder and salt. Cover; refrigerate at least 3 hours.

2. Heat oven to 350°F. Grease cookie sheet with shortening or cooking spray.

3. Drop dough by teaspoonfuls into powdered sugar; roll around to coat and shape into balls. Place about 2 inches apart on cookie sheets.

4. Bake 10 to 12 minutes or until almost no imprint remains when touched lightly in center. Immediately remove from cookie sheets to cooling racks.

Hershey's Cocoa Crinkle Cookies
Source: Hershey's
Yield: 3 dozen

2 cups granulated sugar
3/4 cup vegetable oil
3/4 cup HERSHEY'S SPECIAL DARK Cocoa
4 eggs
2 teaspoons vanilla extract
2-1/3 cups all-purpose flour
2 teaspoons baking powder
1/2 teaspoon salt
Powdered sugar

Directions:1. Combine granulated sugar and oil in large bowl; add cocoa, beating until well blended. Beat in eggs and vanilla. Stir together flour, baking powder and salt; gradually add to cocoa mixture, beating well.

2. Cover; refrigerate until dough is firm enough to handle, at least 6 hours.

3. Heat oven to 350°F. Grease cookie sheet. Shape dough into 1-inch balls; roll in powdered sugar to coat. Place about 2 inches apart on prepared cookie sheet.

4. Bake 11 to 13 minutes or until almost no indentation remains when touched lightly and tops are crackled. Cool slightly. Remove from cookie sheet to wire rack. Cool completely. About 4 dozen cookies.

Tuesday, December 15, 2009

Fall Harvest Bread

I love when a bread recipe makes two. One for me. One for you! For me, the best part of baking (besides gorging on delicious treats) is sharing the love.

I gave a loaf of this bread to my in-laws and heard praise for three days!! I will definitely make this bread again! My next batch will be for a brunch for girls from the Maine Nest. I think they are really going to like this! Pumpkin, apples, cranberries, and pecans...you can't go wrong!!


Pardon the bad lighting in this photo but I wanted to show off the little tags that I include on most of my goodies. The finishing touch that makes it extra special (besides the love...that is what is so special about my baking!).


Fall Harvest Bread
Source: Good Things Catered
Yield: Two loaves

1 1/2 c. all-purpose flour
1 tsp ground cinnamon
1/4 tsp nutmeg
1 tsp baking soda
1/2 tsp salt
1 c. sugar
1/4 c. light brown sugar
1/2 can (or 7.5 oz) pumpkin puree
2 large eggs
1/4 c. oil
1/4 c. applesauce
1/4 c. milk
1 tsp vanilla extract
1 medium apple (I like granny smith) peeled, cored, and diced
1 c. fresh cranberries
1 c. chopped pecans

Preheat oven to 350 degrees. Prepare 9x5 loaf pan or 5 mini loaf pans(or can sub muffin pan or double recipe for cake/bundt pan).

In large bowl, combine flour, cinnamon, nutmeg, baking soda, salt and whisk to combine. In another large bowl, combine sugar, pumpkin, eggs, oil, applesauce, milk, vanilla and stir to combine well. Add dry ingredients to wet ingredients and stir until just barely blended. Fold in apples, cranberries and pecans. Spoon batter into prepared pan (it will be all lumpy - don't worry).

Bake for 60-70 minutes (35-40 minutes for mini loaves) or until wooden pick inserted into center comes out clean. Remove from oven and let cool in pan for 10 minutes. Remove from pan and let cool on wire rack completely (makes the slices much more clean.

Friday, December 11, 2009

White Chocolate Mousse

Every year I cater a brunch for my mother in law and her gal pals for the holidays. Normally I make a chocolate mousse and pipe it into chocolate shells. (Seen here.) This year MIL asked for white chocolate mousse in chocolate shells. Of course I couldn't find any chocolate shells. I had no recipe for white chocolate mousse...had never even made it before. This, possibly, could be a disaster.

I went to Epicurious to search for a white chocolate mousse recipe. Nearly all of them were boring, white chocolate and whipping cream. Really? Zzzzzzzzzz.

Then I saw Gale Gand's name and I knew I could trust her. She is fabulous and everything I have ever made from her recipes has been a success. She absolutely did not let me down with her white chocolate mousse recipe.

If you decide to try this recipe be sure to give yourself a couple days before you serve it. She has you melt the chocolate with the cream two days prior and then whip that one day prior. Believe me...it is worth it. I will definitely make this again. I couldn't stop licking the spoon!!


White Chocolate Mousse
Source: Gale Gand from Food Network
Yield: 6 good size servings...12 small servings (who wants a small serving??!?!)

1 1/2 cups heavy cream
5 ounces white chocolate, coarsely chopped
1/2 cup egg whites (from about 4 eggs)
2 tablespoons sugar

Two days before you plan to serve the dessert, in a small saucepan, heat the cream over medium heat just until it boils. Immediately turn off the heat. Place the chocolate in a medium bowl. Pour the hot cream over the chocolate and whisk until melted and smooth. Strain into another bowl, cover, and refrigerate overnight.

The next day, remove the mixture from the refrigerator and, using a mixer fitted with a whisk attachment or a hand mixer, whip it into fluffy, soft peaks. Return to the refrigerator.

In a clean dry bowl, whip the egg whites until soft peaks form, then add the sugar and continue whipping until glossy and stiff, about 30 seconds more. Fold into the white chocolate mixture, and then spoon the mixture (or pipe through a pastry bag) into glasses. I topped mine with crushed candy cane.

Thursday, December 10, 2009

Holiday Traditions

You know it is the holiday season when Chex mix makes the rounds. I won't post the recipe because you all know it and I don't alter mine at all.

Let's talk holiday traditions, shall we? Growing up when we decorated the tree we always had snacks. I remember having Chex Mix and peanut butter fudge. It really makes me miss my mom to think of that. I can actually see her with that big pot that my father has, I think it was passed down from his father, in the kitchen with the yellow stove and the plaid carpet. (Who puts carpet in a kitchen?!) And we would be picking out which ornaments we wanted to put on the tree. We all had our special ornaments. I miss times like that.

I'm wondering...what do you do when you decorate your tree? Do you have treats? Do you play Christmas music? And for my Jewish friend who I miss a super duper really extra lot...what are you planning for the holidays?

Wednesday, December 9, 2009

Battle OREO

You may have noticed that I made Oreos not too long ago. For that batch I used a Food Network Magazine recipe. The result...good. Not great. Certainly not terrible. I think I was turned off by all the work you had to do to get the cookie part finished. Ugh.

In my Internet travels I have seen a lot of people making Oreos. Two trusted blog sites, Joy the Baker and Smitten Kitchen both did a variation of the Oreo and...well...I didn't know which would better...so I made both. :) I think homemade Oreos will make a fabulous holiday gift and really wow people at gatherings. I must have the perfect cookie. Here, the chocolate wafer cookie recipes go head to head.

Note: Joy didn't make Oreos but chocolate sandwich cookies with various fillings. I found that the Smitten Kitchen filling is perfect. I actually added a tiny bit of peppermint to the filling and thought it was fabulous. So in this battle the filling is not a factor.

Joy the Baker's Cookies:

Smitten Kitchen's Cookies:
The verdict: Joy the Baker's wafer cookie hardly edged out Smitten Kitchen's chocolate wafer. The SK recipe was a bit easier because you don't have to roll out the dough. My first try at these cookies left me with huge saucers. Be sure to use a small round of dough. Joy's cookie recipe resulted in a very light, delicate cookie. It sort of melts in your mouth. I love it. I have some in the freezer to see how they thaw for ease in holiday preparations. (They freeze well...both kinds)
Whichever you decide is your favorite, I hope you enjoy them. Actually, I promise you will enjoy them.

The Best Homemade Oreo Cookies
Sources: Smitten Kitchen and Joy the Baker
Yield: 3 dozen cookies

3/4 cup granulated sugar
1 1/2 cup plus 3 Tablespoons all-purpose flour
3/4 cup plus 1 Tablespoon unsweetened cocoa powder
1/2 teaspoon baking soda
1 1/2 teaspoons salt
15 Tablespoons (7 1/2 ounces) unsalted butter, but into 3/4-inch cubes, at room temperature (this is important)

For the filling:
1/4 cup (1/2 stick) room-temperature, unsalted butter
1/4 cup vegetable shortening
2 cups sifted confectioners’ sugar
2 teaspoons vanilla extract

Position the racks in the lower and upper thirds of the oven and preheat the oven to 350 degrees F. Line two baking sheets with parchment paper.

In the bowl of a stand mixer fitted with a paddle attachment, combine the sugar, flour, cocoa powder, baking soda and salt and mix on low speed. With the mixer running, add the butter a few pieces at a time. The mixture will have a sandy texture at first and then will begin to form peddle-size pieces. As soon as the dough starts to come together, stop the mixer. Make sure all the butter is well incorporated. If there are large butter pockets, mix for a few seconds more.

Form and roll the dough straight from the mixer. The dough becomes hard to work with if chilled.

Transfer the dough to a board and use the heel of your hand or a pastry scraper to shape the dough into a block about 5 by 7 inches. Cut the block into two pieces.

One at a time, roll each block of dough between two pieces of lightly floured parchment paper until about 1/8-inch thick. Using a cookie cutter, cut into 2 inch rounds. Place 1/2 to 1 inch apart on the prepared baking sheet. You can form and roll the dough scraps once after the first roll.

Bake for 12-15 minutes, rotating the sheets halfway through the baking. Remove from the oven and cool on the sheets for 2 to 5 minutes. They’ll be too soft to move straight from the oven. Transfer the cookies to a cooling rack and let cool completely.

For filling, combine butter and shortening then add sugar and vanilla and peppermint if desired. Beat until fluffy.

To Assemble the Cookies:

Place half of the cookies upside down on a work surface. Place a dollop of filling on half of the cookies and top with another. Smoosh down a bit to spread the frosting to the edges.

The cookies can be stored in an airtight container for up to 7 days.

Thursday, December 3, 2009

Vegan Mushroom Wild Rice Soup

Here is another vegan recipe from the Candle Cafe Cookbook. (Can you tell that I like the book??)

Something that I have always been confused about is what wine to use in cooking. The majority of the time a recipe will call for "dry white wine". Well WTF is that?! I just drink what's cheap! I stumbled upon this thread on Chow and found it extremely helpful. The one that hooked me is, "Most often dry vermouth, Noilly Pratt to be exact. That is what Juila used and my mom." Julia and moms always know what to do. I had a hard time finding Noilly Pratt though. I'm still on the lookout for it.

What I did buy are those silly little bottles of wine that come in a four pack. I felt like a dork at the cashier but it is economical and practical! I used nearly one bottle for this soup and put the rest of the bottle (a screw cap which is good) in the fridge. About a week later a recipe I was making called for dry white wine. PERFECT! I love when things work out. (it's the little things in life that make me happy)


I thought this soup was awesome. A great flavor from the leeks and I think you can never go wrong with wild rice and mushrooms!


Mushroom Wild Rice Soup

Source: The Candle Cafe Cookbook
Yield: 6 servings

1/2 cup plus 4t dry white wine
2 garlic cloves, minced
1 small onion, diced
1/4 leek, rinsed and chopped
12 large mushrooms, sliced
1/2t thyme
1/2t oregano
4 cups vegetable broth
1 cup cooked wild rice
4t white flour
S&P

In large saucepan heat 1/2 cup wine to simmer. Add garlic, onion, leek and simmer 10 minutes until tender.

Add mushrooms, thyme, oregano and simmer 5 minutes or until mushrooms are tender. Add broth and bring to low boil. Simmer 20 minutes then stir in cooked rice.

Dissolve flour in remaining wine and add to soup. Bring back to boil.

Season with S&P and serve.

Tuesday, December 1, 2009

Cobb Salad...the vegan way

Get out the vegetable peeler! You are going to peel carrots...lots of carrots...then...even more carrots!! But I swear to you, it is worth it.

This recipe came from the Candle Cafe Cookbook that I received as a gift a year or so ago. I'm certainly cooking vegan much more now that I have a couple good cookbooks to reference. I love the tofu salad part of this recipe, it has great flavor and I took a scoop of it (no veggies or salad) for my lunch the day after making this. I think you could put that tofu salad in a wrap and be delighted with that lunch.


Candle Cafe Cobb Salad with Carrot Ginger Dressing
Source: Candle Cafe Cookbook
Yield: 2 servings

1 pound tofu, cubed
2T chopped fresh dill
2T chopped parsley
4 scallions, finely chopped
1/4T white miso
1/2 cup tahini
S&P
1t fresh lemon juice
1 celery stalk, chopped
1/2 cup shredded carrots
4 cup mesclun
1 large tomato, sliced
3 thin slices soy cheese
5 button mushrooms, sliced
1 cup homemade croutons
1 cup shredded carrots
8 slices tempeh bacon
1/2 cup dressing (recipe below)

Bring pot of water to boil, add tofu and cook 1 minute.

Mix blanched tofu, dill, parsley, scallions, miso, tahini, S&P and lemon juice. Fold in celery and carrots.

Assemble rest of ingredients as salad and top with a big scoop of tofu mixture. Pour dressing over salad prior to serving.

Carrot Ginger Dressing
1/4 cup minced fresh ginger
2 garlic cloves, sliced
1/4 cup diced onions
2 cups shredded carrots
2T apple juice
1t toasted sesame oil
1 cup safflower oil
1/2 cup cider vinegar

Blend ginger, garlic, onions and carrots in food processor. Add apple juice, sesame oil, safflower oil and vinegar slowly until well blended.

Sunday, November 29, 2009

Vegan Coconut Heaven

I made these for football night a few weeks ago. THESE. ARE. AMAZING. The coconut flavor is awesome, the frosting is the bomb, and to boot...they are vegan. This is one of those recipes that I am going to make for the rest of my life. I don't need to look for another coconut cupcake recipe. This is it.

Seth even requested this cake for his birthday. I added toasted coconut to the top for both flavor and color. I doubled both the cake and frosting recipe to make a two layer cake. I can't say enough good things about this cake...you must try it!!

Coconut Heaven Cupcakes
Source: Vegan with a Vengeance
Yield: 12 cupcakes

1 cup flour
1/2t powder
1/2t soda
1/4t salt
1/4 cup canola oil
1 cup coconut milk
2/3 cup sugar
1t vanilla
1 cup shredded coconut


FROSTING
1/4 cup nonhydrogenated margarine at room temp
1/4 cup coconut milk
1t vanilla
2 cups confectioner's sugar
1 cup shredded coconut


Preheat oven to 350 and line muffin tin.

Sift flour, powder, soda and salt. In another bowl combine oil, milk, sugar, and vanilla. Pour dry ingredients into wet and mix until smooth. Fold in coconut. Fill tins 2/3 full. Baked for 20 minutes and cool completely before frosting.

Cream margarine until light and fluffy. Add milk and vanilla and combine. Add sugar and mix until smooth. Add coconut. Frost cupcakes and devour.

Wednesday, November 25, 2009

I Love My Runner.

This is my husband.


He ran his very first marathon over the weekend. He finished running 26.2 miles in 3 hours and 31 minutes. Out of 7475 runners he finished 1346. In his age group he finished 207 of 686. There were 4365 males that ran the race and he finished 1153. And he has signed up for his next marathon in the spring.


I'm really proud of him. At first I felt envious, like...what have I done that is so great?? What accomplishments have I done?? But then I remembered all the work I do for breast cancer education. The conversations I have with my friends and family about this new government task force recommendation and how red my face gets because I am so angry. I guess I'm not a sucker after all.


Plus, he needs me to be on the side lines of the course! Who else is he going to kiss at mile 6 (yes, he really did stop and kiss me and I loved every second of that sweaty kiss). Who would carry a backpack full of his stuff? Who would massage his muscles the night before? Who would meet him at mile 13 to take his hat and arm warmers and offer him a fuel gel??

Plus, if I ran with him I would have to beat him and I'm not sure I could ever do that.

Sunday, November 22, 2009

Stuffed Poblano Peppers

I like Mexican food. I was never a big fan. I'm not sure what happened, maybe my taste buds changed, maybe it was my husband's influence, maybe I never really gave it a chance. Maybe I had never had really good Mexican food. At any rate, I do enjoy it and have tried my hand at a few dishes at home.

This is a Martha recipe that caught my eye. One serving has about 330 calories. (Never mind that mound of cheddar cheese) I'm quite sure what Seth thought of these. He cleaned his plate, had seconds actually, but wasn't as vocal of his liking as he normally is. I thought these were really great, I loved the grit of the cornmeal. I served these with Mexican rice.


Stuffed Poblano Peppers
Source: Martha Stewart Everyday Food
Yield: 4 servings

1 can (28 ounces) whole tomatoes in puree
1 jalapeno chile (ribs and seeds removed, if desired), minced
2 small onions, peeled and chopped
3 garlic cloves, peeled (2 whole, 1 minced)
Salt and black pepper
1 can (19 ounces) black beans, rinsed and drained
1/2 cup yellow cornmeal
1 cup shredded pepper jack cheese
1 teaspoon ground cumin
4 large poblano chiles, halved lengthwise, ribs and seeds removed

Preheat oven to 425 F degrees. In a blender, combine tomatoes in puree, jalapeno, half the onions, and 2 whole garlic cloves. Puree until smooth. Season with salt. Pour the sauce into a 9x13-inch baking dish and then set it aside.

In a medium bowl, combine beans, cornmeal, 1/2 cup cheese, remaining onions, minced garlic, cumin and 3/4 cup water. Season with salt and pepper.

Dividing evenly, stuff the poblano chile halves with the bean mixture and place in the baking dish on top of the sauce. Sprinkle the poblano chiles with the remaining 1/2 cup of cheese. Cover the baking dish with aluminum foil.

Bake until the poblanos are tender, about 45 minutes. Remove foil and continue to cook until the sauce thickens slightly and cheese is golden brown, about 10 to 15 minutes more. Remove from the oven and let cool for 10 minutes before serving.

Friday, November 20, 2009

Broccoli Soup

Sunday is soup night at 179. Well, at least in the fall and winter. Who wants hot soup in the summer?!

I had never made broccoli soup before and will certainly be making it again. I love this recipe. You can control the amount of fat that goes in to it and I love the chunkiness of the veggies. I ended up spooning out about a cup of the soup and blending it with the immersion blender. I also added a bit of cheese when I served it. Definitely a hit. And definitely great for leftovers!!


Creamy Broccoli Soup

Source: Cooking on the Side
Yield: 4 servings

4 cups broccoli florets
2 cups water
1/2 teaspoon onion salt
1 cup celery, chopped
1 cup carrots, chopped
1/2 cup yellow onion, chopped
6 tablespoons butter or margarine
6 tablespoons flour
3 cups chicken broth, low-sodium, may substitute vegetable broth
2 cups milk
1 tablespoon fresh parsley, minced
1/2 teaspoon garlic powder

In a large pot bring water and onion salt to boil and add broccoli, celery and carrots. Bring to a boil, drain and set aside.

Sauté onions in butter until tender. Stir in flour to form a smooth paste. Slowly add broth and milk, stirring constantly. Bring to a boil. Let boil for 1 minute: add vegetables and remaining ingredients. Reduce heat, cover and simmer for 30 to 40 minutes until tender.

Can be prepared 24 hours in advance – refrigerate any leftovers.

Tuesday, November 17, 2009

Smores Bars

Do you know who Joy the Baker is? She is fabulous. I wish I could meet her. California...it is a long ways away.

I saw these on her blog and had been drooling over them for about a week. I was home alone one night (the most dangerous eating time for me) and needed something sweet (more like I was bored and felt like making something and then eating it) so I whipped these up. I took one look at the recipe...3 sticks of butter??!?!? Good Gawd! I halved this recipe and it worked out fantastic.

This one is definitely a keeper!

Smores Icebox Candy Bars
Source: Joy the Baker
Yield: 15 bars

3 sticks plus 2 tablespoons unsalted butter
3/4 cup unsweetened cocoa powder
3/4 cup light corn syrup
pinch of salt
1 14-ounce box graham crackers, lightly crumbled
2 big handfuls of mini marshmallows, plus a handful more for sprinkling on top

Line a 9×13-inch baking sheep with parchment paper, set aside.

In a large bowl, crumble the graham crackers into large chunks. Add two handfuls of mini marshmallows and set aside.

In a medium saucepan over medium heat, melt butter together butter, cocoa, corn syrup and a pinch of salt. Stir and heat until smooth. Once melted, let chocolate mixture cool for 5 minutes.

Pour chocolate mixture over graham crackers and marshmallows. Stir so that all of the graham crackers are moistened by the chocolate mixture. Dump into lined baking pan, and a few more marshmallows on top and press down with the back of a spoon. Cover the top with another sheet of parchment and press with your fingers. Let cool on the counter for 30 minutes, then place in the fridge to solidify for a few hours or overnight. Cut into bars. Wrap individually and store in the fridge.

Wednesday, November 11, 2009

Smashed Chickpea Salad

This is another recipe that I've been meaning to make for about a year. I first saw this on Smitten Kitchen and thought it looked so simple, healthy, and delicious. Finally this past weekend I made it.

While chopping and rinsing vegetables I thought of my friend who married me and Seth. This is a dish she would love. She was always bringing into work some sort of amazing salad. And for the most part she just did these off the top of her head! For pot luck lunches she would share salads with combinations that I wouldn't think of; always healthy, always delicious. So this one is for you J.M.! I think you will really like it! :)

I ate some of this on rosemary bread and found it to be a little tough to eat as a sandwich. The next day I did the same and ate it open face and that worked pretty well. The last day I added a big scoop on top of my salad and that was great too! Very versatile!!

Unsmashed...

Smashed!


Smashed Chickpea Salad
Source: Smitten Kitchen
Yield: About 4

1 15-ounce can chickpeas, drained and rinsed
2 tablespoons pitted, halved and very thinly sliced black olives
1 tablespoon finely chopped red onion
1 tablespoon chopped fresh parsley
Zest and juice from half a lemon
Couple good pinches of salt
A few grinds of black pepper
A few glugs of olive oil (the original is quite oily, like bread-soaking oily, I went a little lighter. Both ways are delicious)

Mix everything but the olive oil in a small to midsize bowl. Very lightly smash the chickpea mixture with the back of a fork or a potato masher. You’re not looking for a hummus-like puree but something closer to a coarse chop with a few smaller bits to hold it together. Add the glugs of olive oil, mix it lightly and enjoy.

Sunday, November 8, 2009

O-R-E-O

I often wonder what I'm going to have for cravings when I'm pregnant. My sister said that she liked mustard on everything. Another one of my friends said that on the hottest day of summer she made her husband drive her to the store for baked beans and that they had never tasted as good as they did on that sweltering day. Of course there are the legends of women loving pickles and ice cream during pregnancy. I'm sort of a weird eater in the first place so I'm curious. I will tell you what...I will miss sushi.

I made these homemade Oreos and had to bring a few to my expecting friend Annie. She emailed me later in the day and said she didn't share them with her husband. Of course not!! I made them for her and the little one! They have growing to do and what better way to grow than eat some chocolate.

I have to say, these don't really taste like Oreos. At all. They are delicious...I mean...they are chocolate cookies with buttercream sandwiched between them. How can you go wrong with that?!

If you decide to give these a whirl give yourself some time...they need time to chill.


Oreos
Source: Food Network Magazine
Yield: 32 cookies

1 1/3 cups Dutch-process cocoa powder
1 1/2 cups all-purpose flour, plus more for dusting
1/4 teaspoon salt
2 sticks unsalted butter, softened
2 cups granulated sugar
2 large eggs
1 teaspoon vanilla extract

For the Filling:
1 stick unsalted butter, softened
1/2 cup vegetable shortening
3 cups confectioners' sugar, sifted
1 teaspoon vanilla extract

Prepare the dough: Sift together the cocoa powder, flour and salt in a large bowl.

Using a mixer, cream the butter and sugar. Add the eggs one at a time, then the vanilla, incorporating each ingredient before adding the next. Add the dry ingredients and mix just until incorporated, scraping the bottom of the bowl with a rubber spatula.

Divide the dough into 2 pieces; place one piece between 2 lightly floured sheets of parchment paper and roll into a 1/4-inch-thick rectangle. Repeat with the other piece of dough. Refrigerate both rectangles, covered with the parchment sheets, until firm, at least 1 hour or up to several days.

Using a 2-inch round cutter, cut the dough into 64 circles. (You can reroll the scraps once.) Place the cookies about 2 inches apart on ungreased baking sheets and chill for 20 minutes. Preheat the oven to 325 degrees.

Bake the cookies until they are set and slightly darker around the edges, about 20 minutes. Cool completely on wire racks.

Meanwhile, prepare the filling: Using a mixer, cream the butter and shortening until fluffy. Beat in the confectioners' sugar and vanilla.

Flip half of the cookies upside down and top each with 1 level tablespoon of filling. Press the remaining cookies on top to make sandwiches.

Friday, November 6, 2009

Blistered Cannelli Beans

I went through a phase where I ate these A LOT! Do you do that? Find something easy to whip up and then end up eating it for a week straight? It just tasted so good and gourmet but it is was a cinch to make. Love dishes like that!

Garlic and crushed red pepper...you know we are off to a good start!


I'm honestly drooling just looking at these!


Blistered Cannellini Beans
Source: The Kitchy Kitchen
Yield: 2 servings

3 15 oz cans of cannellini beans, rinsed and drained
2-3 cloves of garlic, minced
1 tablespoon of rosemary, finely chopped
1 teaspoon chili flakes
about 3 tablespoons of olive oil
salt and pepper
Zest of one lemon

Add the garlic and chili to the oil over a medium flame. Once it starts crackling a little add the rosemary and stir for about 10-15 seconds, careful to not burn the garlic. Add the beans and gently stir to combine everything. Bring the heat up a little, and let the beans sit, getting browned and crisp on the outside. Add salt and pepper to taste, stir, and let them rest for another minute. Pour them onto a serving dish and sprinkle the zest over.

Tuesday, November 3, 2009

Pumpkin Oatmeal

This has been on my "to make" list for a few weeks. Sunday was the perfect time to make this. Seth wanted eggs before going to work and I figured I could quarter this to feed just me. It worked out perfectly and took just a few minutes to whip up.

This was AWESOME. I used walnuts instead of pecans and loved the crunch. I added quite a bit of milk once it was done...I like milky oatmeal. I am definitely going to be making this more often. This would also be great for little ones. Nix the nuts, use raw organic sugar or no sugar, add some raisins. Great source of vitamin A, fiber, and folic acid!

Pumpkin Oatmeal
Source: Craftzine
Yield: 4

1 cup old fashioned oats not quick cook
1 Tbs whole flax seeds (optional)
2½ Tbs brown sugar, packed
½ tsp cinnamon
¼ tsp allspice
⅛ tsp nutmeg
¼ tsp salt
½ tsp vanilla
½ tsp lemon zest (I didn't use this)
2 tsp butter, softened
¾ cup pumpkin puree
¾ cup milk

Topping:
¼ cup pecans, chopped (I used walnuts)
2 tsp butter, softened
1 Tbs brown sugar

Directions
Step 1: Preheat oven to 375°F. Grease 4 individual-sized ramekins. Set aside.

Step 2: Combine the oats, flax seeds, brown sugar, cinnamon, allspice, nutmeg, and salt in a medium-sized bowl. Stir well.

Step 3: Zest the lemon.

Step 4: In a separate bowl, combine the vanilla, lemon zest, butter, pumpkin, and milk. Whisk thoroughly. Pour the pumpkin mixture into the oat mixture. Stir until combined.

Step 5: Divide the mixture evenly between 4 individual-sized ramekins. Place the ramekins on a baking sheet (this makes it easier to move in and out of the oven.). Bake at 375°F for 10 minutes.

Step 6: Meanwhile, combine the ingredients for the topping: chopped pecans, butter, and brown sugar. After the oatmeal has baked for 10 minutes, remove and divide the topping mixture evenly between the ramekins. Bake an additional 7 minutes.

Step 7: Cool for 5 minutes before serving. Top with a splash of milk and raisins, if desired.

Monday, November 2, 2009

Sugar Cookies with Royal Icing

These sugar cookies cause me nostalgia. We made these for Halloween, Christmas, and Valentine's Day as kids. I remember sitting on the counter, my sister and brother sitting in the bar stools at the counter and each of us had a big piece of dough rolled out in front of us. It was really fun to pick out which cookie cutter to use next and of course we ended up fighting over the cutters. My sister has my mother's cookie cutters (shouldn't we have shared custody of them?) and I have my own batch. Mine aren't as cool or original but they do just fine.

I love my mother's handwritten recipes.
I'm quite the mess maker.

Normally I would frost these with a fluffy white frosting but I wanted to try my hand at royal icing. I think I tried it in high school with Tina and it was a flop. This time it went pretty well. I did my research and found some great tutorials. This one really helped. The first batch of "flood" icing wasn't thin enough, the second batch was too watery and by the third batch I had mastered it. I had a lot of fun with these.


Sour Cream Sugar Cookies
Source: My Momma!
Yield: 2 dozen

4 cups flour
1 t. soda
1/2 t. powder
1/2 t. nutmeg
1 cup butter
1 1/2 cups sugar
1 egg
1/2 cup sour cream
1 t. vanilla

Sift together dry ingredients. Beat butter and egg with paddle attachment until fluffy. Add egg, sour cream and vanilla. Slowly add dry ingredients. Chill dough at least one hour. Roll to 1/4 inch thickness and bake at 350 for 10 minutes.

I like to freeze half of the dough for another time.

Sunday, November 1, 2009

Dead Bread

El Dia de los Muertos (Day of the Dead) is celebrated today, November 1st in Mexico. I'm no expert but it sounds like today they celebrate kids and then tomorrow they celebrate those that have passed. Thanks Wikipedia.

I've been meaning to try this recipe for over a year. We had a rainy weekend and the timing was perfect to get this done in time for Halloween and Day of the Dead (no relation). My major tip for this is to make sure you put the "skull" really close to the crossbones because as the whole thing rises the "skull" will move. So mine sort of looks like a blob and an X. Eh. I love this bread toasted. It is slightly sweet...sort of like a porteguese bread. I brought one loaf into work and it was a hit. Slightly over shadowed by the homemade Oreos but I think it held its own.

Pan de los Muertos
Source: CHOW
Yield: 2

1/2 cup granulated sugar, plus more for sprinkling
1 teaspoon kosher salt
1 teaspoon anise seed
1/2 ounce (2 packets) active dry yeast
1/2 cup whole milk
1/2 cup water
8 tablespoons (1 stick) unsalted butter
4 large eggs
4 1/2 cups all-purpose flour
1 egg yolk beaten with 2 teaspoons water

Combine sugar, salt, anise seed, and yeast in a small mixing bowl. Heat milk, water, and butter in a small saucepan over medium heat until butter is just melted; do not allow it to boil. Add milk mixture to dry mixture and beat well with a wire whisk.

Stir in eggs and 1 1/2 cups of the flour and beat well. Add remaining flour, little by little, stirring well with a wooden spoon until dough comes together.

Turn dough out onto a lightly floured wooden board and knead until it is smooth and elastic, and no longer sticky, about 9 to 10 minute . Place dough in a lightly oiled bowl, cover with a clean kitchen towel, and allow it to rise in a warm area until it has doubled in size, about 1 1/2 hours.
Heat the oven to 350°F and arrange a rack in the middle. Punch down dough and divide into 2 pieces. Cut 3 small (about 1-ounce) balls from each half and mold them into skull-and-bones shapes. Shape large balls of dough into round loaf shapes, and place skull-and-bones on top. Place breads on a baking sheet lined with parchment paper and let rise another hour.

Brush loaves with egg yolk mixture and bake. Halfway through baking, about 20 minutes, remove loaves from oven and brush again with egg wash and sprinkle lightly with granulated sugar. Return to oven and bake until loaves are golden brown and sound hollow when tapped, about another 20 minutes.

Friday, October 30, 2009

Pumpkin Cinnamon Rolls

We had a feast. Yes. A feast. For breakfast! I guess that means it was a breakfreast?

Pancakes, eggs, juice, sausage, bacon, orange juice and pumpkin brioche cinnamon rolls (and apple crisp and apple pie). We eat good when my sister is here.

These were really great little cinnamon rolls. They aren't gooey or sticky at all and not too pumpkiny. (Try to tell that to my 9 year old nephew who threw his nose up after finding out that these had pumpkin in them) The icing on the top gives them that extra yumminess.

Enjoy my friends.


Pumpkin Brioche Cinnamon Rolls with Cream Cheese Glaze
Source: Bacon Concentration
Yield: 12 or so

1 package dry yeast
1/4 cup warm water
3 1/4 cups all-purpose flour, divided
1/2 cup canned pumpkin
1/2 cup milk
1/4 cup butter, melted
2 Tbsp granulated sugar
1 1/4 tsp salt
1 1/2 tsp pumpkin pie spice or nutmeg

Filling:
3 Tbsp granulated sugar
3/4 cup golden brown sugar
2 Tbsp ground cinnamon
1/4 cup unsalted butter, room temperature

Glaze:
4 oz. cream cheese, room temperature
1 cup powdered sugar
1/4 cup unsalted butter, room temperature
1/2 tsp vanilla extract


Dissolve yeast in warm water in a large bowl, and let stand for 5 minutes. Add 3 cups flour, canned pumpkin, and next 5 ingredients to yeast mixture, and beat with a mixer at medium speed until smooth.

The dough will be very sticky. Dump 1/4 cup flour onto a working surface, and begin kneading the dough in your hands. Add flour 1 Tbs. at a time from the work surface. Once the dough no longer sticks to your hands, continue to knead on the work surface until the dough is smooth and elastic (about 10 minutes total).

Place dough in a large bowl coated with cooking spray, turning to coat top. Cover and let rise in a warm place for 45 minutes or until dough is doubled in size. Punch dough down, cover and let rest 5 minutes.

On a floured surface roll the dough into a 12 x 10-inch rectangle. Spread the "filling" butter onto the dough, and sprinkle with brown sugar mixture.Roll up the rectangle tightly, starting with a long edge, pressing firmly to eliminate air pockets. Pinch seam and ends to seal. Cut roll into 1 inch slices. Place the slices in a 11x7 or 9x13-inch pan coated with cooking spray.Cover and let rise for 25 minutes or until doubled in size.

Preheat oven to 375 deg. Bake for 18 minutes or until golden. Combine glaze ingredients, and stir until smooth. Spread over rolls while still warm

Wednesday, October 28, 2009

Football Night at 179

My husband is a sport fanatic. Well...maybe not "sports" but a football and basketball fanatic. He could tell you who the NFL MVP was in 1987, the style jersey the team was wearing that year, and a whole list of other facts. In 1987 I was more concerned with brushing the tail of my favorite My Little Pony.

For the most part I don't mind hanging out and watching football. (We root for the Giants and Notre Dame in our house) Mostly I sit and play with recipe binders or read a magazine. Last night I completely passed out. One of my favorite parts is when they do the intro of the teams and their faces pop up and they say their name and what school they are from. I go through and say yes or no if I think they are cute. Seth likes that game too.

Of course on occasion we have special food for football night. Like grilled vegetable muffuletta and spicy pretzels. The muffuletta was tasty but really hard to eat. That thing was probably 4-5 inches tall! Delicious and healthy so it was worth the mess I made eating mine. I make the pretzels often and don't really have a recipe. I just drizzle them with a bit of oil and then shake seasoning on them. I normally do a mixture of garlic salt, cumin, cayenne, garlic powder, mustard, and pepper then bake them for a while.

Go Giants. Go Robby Parris! :)


Grilled Vegetable Muffuletta
Source: Rachael Ray
Yield: 4 servings

1 eggplant, sliced 1/2 inch thick
1 zucchini, sliced 1/2 inch thick on an angle
1 red bell pepper, quartered lengthwise
1 large portobello mushroom cap
1 red onion, sliced 3/4 inch thick
1/2 cup extra virgin olive oil (EVOO)
Salt and pepper
6 ounces baby spinach
1/3 cup pine nuts (a generous handful)
2/3 cup grated Parmigiano Reggiano cheese (a couple generous handfuls)
1 cup store-bought giardiniera (pickled vegetable salad)
1/2 cup pitted green olives
One 8- to 9-inch round loaf crusty bread
1/4 pound deli-sliced provolone cheese

Pre-heat a grill or grill pan to medium-high. Lightly brush the eggplant, zucchini, bell pepper, portobello and red onion with 1/4 cup EVOO; season with salt and pepper. Cover and grill, turning once, until charred, about 6 minutes.

Using a food processor, puree the spinach, pine nuts and Parmigiano Reggiano; season with salt and pepper. With the machine on, drizzle in the remaining 1/4 cup EVOO. Transfer the pesto to a bowl; rinse the food processor.

Using the food processor, pulse the giardiniera and olives into a coarse relish.

Slice the top quarter off the bread and scoop out the insides. Spread half the pesto on the inside of the bread, layer with half of the grilled vegetables, then spoon the remaining pesto on top. Fill the bread with the remaining vegetables and top with the provolone. Spread the inside of the bread top with the vegetable relish and set into place. Press down firmly, then cut into wedges.

Monday, October 26, 2009

Parker House Rolls

It is getting colder in Maine. The days are shorter. The things coming out of my kitchen are more hearty. I have great memories of my mother making beef and barley soup with yeast rolls on cold fall days. I asked her to teach me to make that soup the fall before she died. I have a long list of things that I should have been asking her to teach me! Like knitting and sewing!!

This past weekend I made vegetable and barley soup with these rolls that have been on my "to make" list for over a year. I am going to be making these a lot. I was so pleased with the way they turned out. The texture of the dough is perfect, soft and a little bit chewy. The herb butter gives a great flavor here and there. Plus look how beautiful they are in that pan!!

Parker House Rolls
Source: CHOW
Yield: 32 or so rolls

1/4 ounce (1 packet) active dry yeast
3/4 cup warm water (100°F to 110°F)
1 1/4 cups well-shaken buttermilk
1/4 cup clover honey
5 2/3 cups bread flour (about 1 pound 14 ounces)
2 teaspoons kosher salt
6 tablespoons unsalted butter (3/4 stick), cut into small pieces, plus more for the bowl and dish
1 recipe Fall Herb Butter, melted
2 teaspoons fleur de sel

Dissolve yeast in warm water in a medium bowl; set aside until foamy, about 5 minutes. Stir buttermilk and honey into yeast mixture; set aside.
Stir together flour and salt in the bowl of a stand mixer fitted with a dough hook, make a well in the center, pour in yeast mixture, and mix on low speed until evenly incorporated, about 2 minutes.

Increase mixer speed to medium low and add butter, a few pieces at a time, letting butter completely incorporate before adding more. Mix dough until smooth, elastic, and slightly soft, about 10 minutes total.

Butter a large bowl, place dough in the bowl, and turn to coat. Cover with a damp kitchen towel and let rise in a warm place until doubled in size, about 1 hour. Meanwhile, coat a 13-by-9-inch baking dish with butter.

Once dough has risen, divide in two equal pieces. On a lightly floured surface, roll out one piece into a 12-by-10-inch rectangle, keeping the second piece covered with a towel.
Cut the rolled rectangle of dough lengthwise into 5 strips. Cut each strip into 3 smaller rectangles. Measure 2 tablespoons of the herb butter and reserve. Spread a heaping 1/2 teaspoon of remaining butter on a rectangle, fold the rectangle in half, and set aside. Repeat with remaining rectangles. Repeat entire process with second piece of dough.

Arrange rolls seam-side down in the prepared pan, 6 across and 5 down. Cover with a clean kitchen towel and let rise in a warm place until doubled in size, about 1 hour. Meanwhile, heat the oven to 350°F and arrange a rack in the lower third.

Once dough has risen, brush reserved 2 tablespoons herb butter over top of rolls and sprinkle with fleur de sel. Bake until bottom and tops of rolls are golden brown, about 40 minutes. Remove from the oven, let cool 5 minutes, and serve.

Saturday, October 24, 2009

FakonLT

Fakon. It's a funny word. Oh, you aren't sure what fakon is? Fake bacon. At first I wasn't so sure about the stuff. I was brought up on real bacon and loved it. (I still do but my thighs don't really like it...and neither does my husband) We started buying it for breakfast and it was OK but then I discovered that if you add it to things it really does taste more like bacon!

I had been craving a BLT and decided that I would try making an FLT. Fakon, lettuce, and tomato on white bread. I thought about it all day at work so when I got home, made it, and bit into it I was really happy. I used fresh tomatoes from the garden, and toasted the bread in the oven on one side so you still get the crisp bread but it isn't too hard on your mouth.

Fakon, it's whats for dinner.


FakonLT
Source: ME!
Yield: one delicious healthy sandwich

Bread
3-4 slices of fakon
Tomato
Lettuce
Mayo or Veganaise
S&P

While you cook the fakon on the stove top toast the bread under the broiler. Spread mayo on both side of bread and season with S&P. Layer on the fakon, lettuce and tomato and dig in!

Thursday, October 22, 2009

Honey Oatmeal Bread

Hey my foodies friends!

You like bread, right? Homemade bread of course. Cut really thick with some fresh butter on it? Maybe even a day old toasted with some peanut butter? Yeah, I do too.

I make bread a lot during the fall and winter. I'm not sure why I don't in the summer because the house is so warm that the bread would rise really fast...and homemade bread beats store bought bread any day. I have a variety of bread baking books and one on my wish list but I find that if I'm stuck I can always go over to the King Arthur website and find a fun recipe there. I even have a few giftcards kicking around and think I may buy some sour dough starter from KA. That will be a whole post itself, I'm sure.

This is honey oatmeal bread. Thick and hearty. Great warm from the oven but also for toast the next day. It comes together quite easily and I think everyone will enjoy it!

I thought this proofing yeast looked like a brain. :)


Honey Oatmeal Bread
Source: King Arthur Flour
Yield: one loaf

3/4 cup lukewarm water
1 1/2 cups "quick" rolled oats
2 packets "highly active" dry yeast; or 1 tablespoon active dry yeast; or 2 3/4 teaspoons instant yeast
2 tablespoons honey
1 tablespoon brown sugar
6 tablespoons (3/4 stick) butter
1/2 cup unsweetened applesauce
1 1/2 teaspoons salt
1/2 cup instant mashed potato flakes
2 1/4 cups King Arthur Unbleached All-Purpose Flour
2 tablespoons oats, to sprinkle on top, optional

1) Combine the 3/4 cup water and oats, and let rest for 20 minutes. This gives the oats a chance to absorb the water and soften up.

2) If you're using active or "highly active" dry yeast, dissolve it in 2 tablespoons of the lukewarm water with a pinch of sugar. It should start to bubble as the oats and water rest.

3) Add the remaining ingredients to the oats (including the yeast/water/sugar mixture, if you're using active dry yeast), and mix and knead—by hand, electric mixer, or bread machine set on the dough cycle—until the dough feels springy; it will be quite stiff.

4) Place the dough in a lightly greased bowl, and allow it to rise, covered, for 2 hours; it's a slow riser.

5) Gently deflate the dough, and shape it into an 8" log. Place it in a lightly greased 8 1/2" x 4 1/2" loaf pan. Cover the pan loosely with lightly greased plastic wrap.

6) Allow the dough to rise at room temperature for 1 3/4 to 2 hours, till it's crowned about 1 1/2" over the rim of the pan. Towards the end of the rising time, preheat the oven to 350°F.

7) Brush the top of the loaf with milk, and sprinkle with oats, if desired.

8) Bake the bread for 20 minutes. Tent it loosely with aluminum foil, and bake for an additional 25 to 30 minutes. When the bread is done, it'll be golden brown, and an instant-read thermometer inserted into the center will register 190°F.

9) Remove the bread from the oven, wait 5 minutes, then turn it out of the pan onto a rack to cool. Cool completely before slicing. Store well-wrapped at room temperature.

Thursday, October 15, 2009

Into the Pink Pretzels

I'm sorry for being away my foodie friends. You see...I've been busy. Not really with cooking or baking but with being an activist. You know I hate breast cancer; we've been over this before. Here. And here. A few other spots too.

For my most recent event I collaborated with the very talented Bruce Mayo, a local artist. He wanted to throw a bash for his 40th birthday and instead of gifts wanted to create a new batch of work and have them sold for breast cancer awareness. He knows of my passion and allowed me to pick the charity. I chose Keep A Breast because of the audience they target and their unconventional way of awareness. They are very unique. Just like me. Just like my mum.

By the end of the night Bruce had sold 21 of his 29 pieces and we had raised nearly $3000 to send to KAB. In the end I believe we will be around the $4000 mark. What a great event and a fun night!


Honestly these pretzels have nothing to do with the event or even breast cancer. What I can say is that these are perfect. I am throwing out my old recipe for soft pretzels and using this one. Absolutely delightful!


Soft Pretzels
Source: Alton Brown
Yield: 8 big fat pretzels

1 1/2 cups warm (110 to 115 degrees F) water
1 tablespoon sugar
2 teaspoons kosher salt
1 package active dry yeast
22 ounces all-purpose flour, approximately 4 1/2 cups
2 ounces unsalted butter, melted
Vegetable oil, for pan
10 cups water
2/3 cup baking soda
1 large egg yolk beaten with 1 tablespoon water
Pretzel salt

Combine the water, sugar and kosher salt in the bowl of a stand mixer and sprinkle the yeast on top. Allow to sit for 5 minutes or until the mixture begins to foam. Add the flour and butter and, using the dough hook attachment, mix on low speed until well combined. Change to medium speed and knead until the dough is smooth and pulls away from the side of the bowl, approximately 4 to 5 minutes. Remove the dough from the bowl, clean the bowl and then oil it well with vegetable oil. Return the dough to the bowl, cover with plastic wrap and sit in a warm place for approximately 50 to 55 minutes or until the dough has doubled in size.

Preheat the oven to 450 degrees F. Line 2 half-sheet pans with parchment paper and lightly brush with the vegetable oil. Set aside.

Bring the 10 cups of water and the baking soda to a rolling boil in an 8-quart saucepan or roasting pan.

In the meantime, turn the dough out onto a slightly oiled work surface and divide into 8 equal pieces. Roll out each piece of dough into a 24-inch rope. Make a U-shape with the rope, holding the ends of the rope, cross them over each other and press onto the bottom of the U in order to form the shape of a pretzel. Place onto the parchment-lined half sheet pan.

Place the pretzels into the boiling water, 1 by 1, for 30 seconds. Remove them from the water using a large flat spatula. Return to the half sheet pan, brush the top of each pretzel with the beaten egg yolk and water mixture and sprinkle with the pretzel salt. Bake until dark golden brown in color, approximately 12 to 14 minutes. Transfer to a cooling rack for at least 5 minutes before serving.