Saturday, February 28, 2009

Daring Bakers: Flourless Chocolate Cake


The February 2009 challenge is hosted by Wendy of WMPE's blog and Dharm of Dad ~ Baker & Chef. We have chosen a Chocolate Valentino cake by Chef Wan; a Vanilla Ice Cream recipe from Dharm and a Vanilla Ice Cream recipe from Wendy as the challenge.

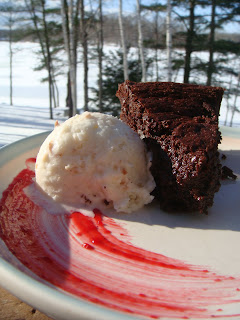
I chose to use my own ice cream recipe for this challenge. Toasted Coconut Ice Cream. Yum!

I served this dessert to my dad and his girlfriend, Jean. I think they both liked it. My husband wasn't much of a fan as this is super chocolately and while he likes sweets he isn't a chocolate fan like I am. He did, however, love the ice cream.

I thought the cake was divine. Extra chocolatey and dense. I ate about a quarter of the entire cake for breakfast one day. Now that is Van Den Bossche style. After doing this I had a conversation with my sister about richness. I suppose that this cake is rich. I also suppose that I am missing that part of my palate. I don't sense richness. When people say, "Oh this is so rich." I say, "Give me more." My sister is the same.


Chocolate Valentino
Yield: 8 inch cake

16 ounces (1 pound) (454 grams) of semisweet chocolate, roughly chopped
½ cup (1 stick) plus 2 tablespoons (146 grams total) of unsalted butter
5 large eggs separated

1. Put chocolate and butter in a heatproof bowl and set over a pan of simmering water (the bottom of the bowl should not touch the water) and melt, stirring often.

2. While your chocolate butter mixture is cooling. Butter your pan and line with a parchment circle then butter the parchment.

3. Separate the egg yolks from the egg whites and put into two medium/large bowls.

4. Whip the egg whites in a medium/large grease free bowl until stiff peaks are formed (do not over-whip or the cake will be dry).

5. With the same beater beat the egg yolks together.

6. Add the egg yolks to the cooled chocolate.

7. Fold in 1/3 of the egg whites into the chocolate mixture and follow with remaining 2/3rds. Fold until no white remains without deflating the batter.

8. Pour batter into prepared pan, the batter should fill the pan 3/4 of the way full, and bake at 375F/190C9. Bake for 25 minutes until an instant read thermometer reads 140F/60C. Note – If you do not have an instant read thermometer, the top of the cake will look similar to a brownie and a cake tester will appear wet.10. Cool cake on a rack for 10 minutes then unmold.

Sunday, February 22, 2009

The Cat in the Hat

I couldn't help myself. I was cleaning up and the hat was right there and the cat. I think it gives him a sort of roaring twenties kind of look.

He actually didn't mind it that much. I was trying to get some pictures of Tickles and when I went back to Boyd he had passed out with that hat over his eyes.

It's Great to be Alive

All that has been swirling in my head are the lyrics to this new record. I'm quickly becoming obsessed with Chris Ferran.

Cake balls are hot in the food blog world these days. Around the holidays I heard about them multiple times a day. I was in charge of dessert for a meal at my in-laws and decided to make them. Easy and cheap!


I think I would have really enjoyed these if I hadn't coated them in that almond bark crap. Ick. Fake chocolate. Next time I will use Hershey kisses.
I used red velvet cake with cream cheese frosting but you can mix and match all you want. Chocolate cake with chocolate frosting. Peanut butter frosting (do they make that in a can?). Vanilla cake with white frosting tinted pink for a breast cancer awareness bake sale. Just some ideas.


Cake Balls
Yield: 4 dozenish
Source: Allrecipes

1 box cake mix (any kind)
1 can frosting (any kind)
Chocolate coating of some sort

Bake cake per directions using any cake pan. While cake is still hot crumble into a large bowl. Add can of frosting. Roll into 1 inch balls and allow to cool or stick in the freezer (or outside if it's a cold Maine day like it has been here for too long). Coat in chocolate.

Monday, February 16, 2009

A Middle Eastern FEAST


We have made a Valentine's Day tradition of having a exquisite meal in celebration of one another. Last year we had a Divine Italian meal. This year we decided on a Middle Eastern menu. Falafel with tzatziki in homemade pitas, hummus with crostini and store bought chili olives, baklava, and of course chocolate covered strawberries.

This was my second run at hummus and find that homemade is much better and more healthy than store bought. Cheaper too! As I've mentioned a few times in this blog I am a big fan of garlic. I added ALOT of garlic to my hummus and my husband commented that it may have been overload. I don't even know how one can use garlic and overload in a sentence. Doesn't make sense to me.

I wasn't sure how the pitas would come out. The dough is very simple and was trying to figure out how they would split themselves. I never figured it out. They just do. The puff right up in the 450 degree oven. These were ridiculously good. When possible I'd prefer to make them from scratch rather than buy them. They are so much better than the store bought kind.

The falafel was also crazy good. Very easy to mix together in the food processor. We topped ours with tzatziki (Greek yogurt, garlic, shredded cucumber, and a bit of S&P), onions, and tomatoes all stuffed into a pita. I honestly think this was one of the best main dishes to ever be created in my kitchen. I melted just a bit on my floor.

The baklava came out pretty good. Working with phyllo dough isn't my favorite thing to do. The recipe asks you to butter every two layers and of course they tear and split. The part I found the best of the finished product is the buttery bottom layers so I guess it was worth it. I probably won't make this too often but if in need of baklava I'd stick with this recipe. I threw in a few cloves to add flavor to the sauce.


Garlic Hummus
Yield: 2 cups
Source: Myself!
1 can chickpeas, drained
2-6 cloves of garlic
2 T parsley
2 T cilantro
1 T tahini
S&P
2 T EVOO
Juice of one lemon
I blend all of this in a food processor. For this meal I served this with crostini.

Pitas
Yield: 8 pitas

3 cups flour
1 1/2 teaspoons salt
1 Tablespoon sugar
1 packet yeast
1 1/4 to 1 1/2 cups warm water
2 tablespoons olive oil

Mix the yeast in with the flour, salt, and sugar with mixer. Add the olive oil and 1 1/4 cup water and mix all of the ingredients to form a ball.

Once all of the ingredients form a ball, place the ball on a work surface and knead the dough for approximately 10 minutes.
When you are done kneading the dough, place it in a bowl that has been lightly coated with oil. Form a ball out of the dough and place it into the bowl, rolling the ball of dough around in the bowl so that it has a light coat of oil on all sides. Cover the bowl with plastic wrap or a damp kitchen towel and set aside to rise until it has doubled in size, approximately 90 minutes.
When it has doubled in size, punch the dough down to release some of the trapped gases and divide it into 8 pieces. Roll each piece into a ball, cover the balls with a damp kitchen towel, and let them rest for 20 minutes. This step allows the dough to relax so that it’ll be easier to shape.
While the dough is resting, preheat the oven to 450 degrees. If you have a baking stone, put it in the oven to preheat as well. If you do not have a baking stone, turn a cookie sheet upside down and place it on the middle rack of the oven while you are preheating the oven. This will be the surface on which you bake your pitas.

After the dough has relaxed for 20 minutes, spread a light coating of flour on a work surface and place one of the balls of dough there. Sprinkle a little bit of flour on top of the dough and use a rolling pin or your hands to stretch and flatten the dough. You should be able to roll it out to between 1/8 and 1/4 inch thick - 6 inches in diameter. If the dough does not stretch sufficiently you can cover it with the damp towel and let it rest 5 to 10 minutes before trying again.
Place discs on a lightly greased baking sheet and let rise, uncovered, until barely doubled in thickness, about 30-45 minutes.

Place as many pitas as you can fit on the hot baking surface. They should be baked through and puffy after 3 minutes.

Falafel
Yield: 12 good size balls
Source: Epicurious

1 cup dried chickpeas
1/2 large onion, roughly chopped (about 1 cup)
2 tablespoons finely chopped fresh parsley
2 tablespoons finely chopped fresh cilantro
1 teaspoon salt
1/2-1 teaspoon dried hot red pepper
4 cloves of garlic
1 teaspoon cumin
1 teaspoon baking powder
4-6 tablespoons flour
Soybean or vegetable oil for frying
1. Put the chickpeas in a large bowl and add enough cold water to cover them by at least 2 inches. Let soak overnight, then drain. Or use canned chickpeas, drained.
2. Place the drained, uncooked chickpeas and the onions in the bowl of a food processor fitted with a steel blade. Add the parsley, cilantro, salt, hot pepper, garlic, and cumin. Process until blended but not pureed.
3. Sprinkle in the baking powder and 4 tablespoons of the flour, and pulse. You want to add enough flour so that the dough forms a small ball and no longer sticks to your hands. Turn into a bowl and refrigerate, covered, for several hours.
4. Form the chickpea mixture into balls about the size of walnuts, or use a falafel scoop.
5. Heat 3 inches of oil to 375 degrees in a deep pot or wok and fry 1 ball to test. If it falls apart, add a little flour. Then fry about 6 balls at once for a few minutes on each side, or until golden brown. Drain on paper towels.

Baklava
Yield: 18 pieces
Source: Allrecipes

1 (16 ounce) package phyllo dough
1 pound chopped nuts
1 cup butter
1 teaspoon ground cinnamon
1 cup water
1 cup white sugar
1 teaspoon vanilla extract
1/2 cup honey

Preheat oven to 350 degrees. Butter the bottoms and sides of a 9x13 inch pan. Chop nuts and toss with cinnamon. Set aside. Unroll phyllo dough. Cut whole stack in half to fit pan. Cover phyllo with a dampened cloth to keep from drying out as you work. Place two sheets of dough in pan, butter thoroughly. Repeat until you have 8 sheets layered. Sprinkle 2 - 3 tablespoons of nut mixture on top. Top with two sheets of dough, butter, nuts, layering as you go. The top layer should be about 6 - 8 sheets deep.
Using a sharp knife cut into diamond or square shapes all the way to the bottom of the pan. You may cut into 4 long rows the make diagonal cuts. Bake for about 50 minutes until baklava is golden and crisp.
Make sauce while baklava is baking. Boil sugar and water until sugar is melted. Add vanilla and honey. Simmer for about 20 minutes.
Remove baklava from oven and immediately spoon sauce over it. Let cool.

B is for...

Brianne and Bonnie Lee!, Baking, Breast Cancer Awareness, Belgian Baby, Biswell Tattoos, Boyd, Ballet, Blonde (or Brunette), my Bunny Rabbit, and a bounty of other things.


Tuesday, February 10, 2009

Buttermilk Braid

I love my Daddy/Daughter time and if I don't have any in a long period of time I crave it. I have quite a case of the winter blues and whenever I am blue a dose of Daddy/Daughter usually cures me for a bit. This past weekend Seth and I went to my dad's house for Sunday dinner. As usual I was in charge of bread and dessert (Daring Bakers teaser!). I saw this recipe on Annie's Eats and thought it looked delectable. I always seem to have just a bit of buttermilk in the fridge, leftover from weekend buttermilk pancakes or Grammy Dill's biscuits.

The making of this dough was extended over time because Seth and I went to Boston to see Fake Problems and I knew I wouldn't have the energy to make bread on Sunday morning. I made it Saturday morning and allowed it to rise in the refrigerator overnight. Sunday morning I just let it come to room temp and then formed it to allow the second rise.

The buttermilk adds a nice tang to the bread. Everyone seemed to really enjoy the bread. I braided one half and make the other half into a loaf for toast. I chose to top both loaves with seasame seeds. It makes a mean piece of toast!!


I can't take credit for the cooking of these scallops, but my dad can! Fresh from Hallowell Seafood, hand battered and fried. They were perfection. My daddy is a good cook!


Buttermilk Honey Bread
Annie's Eats Blog
Yield: 2 loaves

3/4 cup warm water (105-115 degrees F)
1 tbsp. instant yeast
1 tsp. sugar
1 1/2 cups buttermilk, room temp
2 tbsp. unsalted butter, melted
3 tbsp. honey, warmed until runny
1 tbsp. salt
6 - 6 1/4 cups all-purpose flour
1 egg beaten with 1 tbsp. milk or cream (for egg wash)
Sesame seeds or poppy seeds for topping (optional)

In the bowl of a stand mixer fitted with the paddle attachment, combine the water, yeast, sugar, buttermilk, butter, honey, salt, and 4 cups of the flour. Mix on low speed just until a dough has formed. Switch to the dough hook. Continue mixing on low speed, adding the remaining flour 1/2 cup at a time until a smooth dough is formed that clears the sides of the bowl. Knead by hand until dough is smooth and elastic. Transfer the dough to a lightly greased bowl, turning once to coat, and cover the bowl with plastic wrap. Let rise at room temperature until doubled in bulk, about 60-75 minutes.

Turn the dough out onto a lightly floured work surface and gently punch it down. Grease two loaf pans (if using). Divide the dough into two equal pieces and shape as desired. Cover the loaves lightly with plastic wrap or a clean kitchen towel and let rise until fully doubled in bulk, about 45 minutes.

Twenty minutes before you want to bake the bread, preheat the oven to 375 degrees F. Center a rack in the oven. Just before putting the loaves in the oven, brush the tops with the egg wash and sprinkle with topping, if desired. Place the pans on the center rack and bake about 45 minutes, rotating 180 degrees halfway through the baking time. If the tops brown too quickly, cover loosely with aluminum foil. Remove the loafs immediately to a cooling rack. Let cool completely before slicing.

Sunday, February 8, 2009

Doughnut or Muffin?

Marge Standish was commonly referenced in our house growing up. Mostly she was reference for using way too much butter but is that really a bad thing? Marjorie Standish is a Maine (from Gardiner!) cookbook author who is quite famous within the state. I remember my grandmother using her cookbook often and my father still has the one that was my mothers. While writing this post I dug it out and inside the front cover in my mothers handwriting is her name and the date, January 22, 1979, and a note that it is from her dear friend Elaine. Throughout the book are notes from my mother. "Good 3/81," "Small cake 8/79," "Tony's favorite". If I thought I'd live through it I'd try to steal it from my father as it is quite treasured by all of us. Her cooking is simple and uses the local ingredients of Maine. Lots of butter, potatoes, seafood, and cream!

One of the first things I made as a kid was doughnut muffins. These are a plain muffin with nutmeg and a cinnamon sugar topping giving it that doughnut like flavor. As an adult I discovered doughnut muffins at the Market Basket in Camden, Maine. My hope in my most recent batch of muffins was to replicate those at the Market Basket. They sell two sizes, one regular muffin size and one smaller with a dent in the bottom to more resemble a doughnut (I guess). I don't know how they achieve the crispiness of the outside of the muffin. A Marge Standish doughnut muffin has a sprinkle of cinnamon and sugar on the top but those at Market Basket are doused in it. In my attempt I brushed the entire muffin with butter and then rolled them in cinnamon and sugar which resulted in something delicious but not quite the same as the perfection of the Market Basket.


Doughnut Muffins
Source: Marjorie Standish
Yield: One dozen medium sized muffins

1 egg
1/3 cup oil
1/2 cup milk
1 1/2 cups flour
2 t baking powder
1/2 t salt
1/2 t nutmeg
1/2 cup sugar

Beat egg and then add oil and milk. Beat. Sift the dry ingredients. Add dry to wet and stir with forks. Pour into greased muffin tin. Sprinkle with cinnamon and sugar and dot with butter. Bake at 400 for 20 minutes.
  • Optional: Once the muffins came out of the oven I brushed each with melted butter then rolled completely in cinnamon and sugar.

Tuesday, February 3, 2009

TWD: World Peace Cookies

Thank you to Jessica of cookbookhabit who chose World Peace Cookies for the first challenge of February.

Now, they (who are "they" anyway) say that you shouldn't eat raw dough. Haha! We've tricked "them"! No eggs in this dough. Eat away and enjoy. I did, lots of it. I will explain later but upon cutting the logs the dough crumbled and made it's way to my mouth.

I wasn't going to do this challenge but decided last minute that I'd do it just in case I'm not able to do one later in the month. I'm glad I changed my mind. These cookies are not peaceful. My mouth is flipping out with excitement and crying for some milk (if only it wasn't dated 3 days ago). Satisfying my sweet tooth and my chocolate craving, these cookies need to leave my house immediately! MMSA you are in for a treat.

I'm warning you, when mixing this up according to instructions the dough is extremely crumbly. She says to pour the dough onto work surface and gather it up. Um. It was like course sand! After pressing and, like she said, gathering it did come together. I was a bit of a procrastinator so time wasn't on my side. I stuck the dough logs in the freezer for about an hour and half. This worked perfectly. The logs cut fairly well. A little crumbly on the ends but for the most part success.

In closing I could say, "peace be with you." Or maybe using my best Miss America/USA voice, "and world peace." Instead I will use a quote used by a co-worker, "peace, love, and hippy beads." Enjoy.
**EDIT** The next morning...not nearly as good as fresh out of the oven. Bummer.

When I ROLLED into your hometown...

As I mentioned in a previous post I'm always on the look out for this certain kind of roll similar to that at the Governor's Restaurant in Maine. These rolls were the closest that I have come thus far. The dough was more stretchy than most rolls that I make. The recipe calls for "fermented dough" which is just a hunk of dough that is left in the fridge for 24 or so hours. I loved the smell of the fermented dough, very similar to sourdough (an upcoming personal challenge).


The day after I made these rolls we had breakfast for supper which is very popular at our house. I grilled the rolls and topped them with eggs (his scrambled and mine over medium) and Irish cheddar cheese. Delicious.


Delicate Butter Bread
The Easy Way to Artisan Breads & Pastries by Avner Laskin
Yield 2 loaves or about 10 rolls

1 cup water
4 t. dry yeast
1/3 cup butter at room temp
1 1/4 pounds fermented bread dough
3 cups bread flour
2 t. salt
1 egg, beaten with 2 T cold milk for brushing the tops

Use mixer to mix water, yeast, butter, dough, and flour on low for 3 minutes. Add salt and beat or knead for 10 minutes. Cover and let rise one hour.

Divide dough into 2 equal parts and then into 5 pieces. Roll each piece into ball. Use 5 balls to make a line and pinch dough to fasten. Brush with egg mixture and let rise 1 hour.

Bake in preheated 400 degree oven for 35 minutes.